Tuesday, December 29, 2015

Book Review: Winter

Winter
by  Marissa Meyer
Date Read:  12/23/15
Rating: ★ ★ 
★ ★  ★ 

Thank goodness that the string of horrible YA series finales have ended. Thank you, Marissa Meyer. Thank you.  For this reason, even though I will explain one thing about the book I didn’t like, I’m still giving it 5 stars. In all reality, it would be 4.5 stars – but since I can’t give half stars, I definitely have to lean to the 5 star side.

This was an incredibly long book. 824 pages to be exact.  Most of that was because the characters were almost always separated. In order to tell the full story, Meyer had to tell what was going on for each of the characters – which means several chapters were all about the same time period.  I wish that it was a little shorter (so I wouldn’t have had to pay a $0.20 late fee to the library to finish it) but there really weren’t any points looking back that I felt like could have been completely removed.  However, their plans never worked out. While I don’t like stories where their master plans work 100%, I felt that some of it should have gone a little more to plan than it did.

This leads me in to what I didn’t like about this book: everyone was captured or kidnapped at some point in the book.  It was ridiculous. Toward the end, it was actually getting hard to remember who was captured, who was still following the plan, and who was with who.

The only other thing that gave me a bit of a twinge was Cress and Winter’s constant “does he love me?” / “he doesn’t love me” scenes.  Since we as the reader knew their actual feelings, it just got a little overdone I think. In the scenarios that they were facing, I felt like they had more important things to worry about than whether the guy they like likes them back.

Cress is my least favorite character I think…which is disappointing because Rapunzel is one of my favorite princesses.  I just felt she was very annoying with her low self-esteem – while it seems reasonable in her life, I just wish she had gained more self-esteem by the end of the series. I’m glad she did get a little braver though. I loved her techy mind though – I just wish she had a little more a kick-butt attitude like Felicity Smoak (Green Arrow comic and tv show).

Cinder and Scarlet were by far my favorite characters throughout the series and that maintained through to the end.  Cinder had a good transformation in this series. It is actually hard to think back to the very first book where she felt degraded and was trying to save her step-sister’s life.  Scarlet was just a fun character who had such a fun attitude. I also liked their boyfriends. 

Winter was a little hard for me to attach to. While she was sweet, her crazy episodes would get confusing sometimes – but maybe that was the point. She became an interesting character about 25% of the way in to this story, when the Snow White story really took hold.

I thought Marissa Meyer did a great job with this story.  While I enjoyed Scarlet and Cress (Red Riding Hood and Rapuznel), I thought she had done the best job with Cinder (Cinderella).  But now I think it’s a toss up with her Snow White story. The main plot points matched up with the Snow White story so well, but never felt forced. The “huntsman” letting her go was done very well.  And the whole “poison apple” part was just evil. I thought it was genius. 

The best part is the ending.  Once the battle got going, it moved really fast.   I felt the ending was very satisfying. We got a pretty decent amount of wrap up too, which I really appreciated.  But it’s a bit bittersweet, because now the series is over. I’ve fallen in love with Meyer’s characters and world, and now it’s just over. While I will miss those characters, I’m looking forward to what Meyer will write next – and you can be sure I will read it.  This is a must read series, and I will be owning all the books – I haven’t bought a book series in many years – I think since I started the Mortal Instruments Series (and I’ve bought all subsequent books) – so that’s been several years.


Thank you Marissa Meyer.

Tuesday, December 22, 2015

Movie Review: Star Wars Episode VII: The Force Awakens

STAR WARS!!!!  Can you believe there is a new Star Wars movie out? And one that didn’t suck?!  Actually, when Episodes 1-3 were released a long time ago, I actually sort of enjoyed them just because they were updated and episodes released in my lifetime. Though, when I look back at it now that I’m 30, I realize that they are not good. They’re pretty bad actually. JarJar, while funny at the time, is super obnoxious to me now.

But have no fear Star Wars fans!  This movie is amazing!  While the story seemed to follow the same sort of path as episodes 4-6, it was still compelling. I’m hoping it changes in episodes 8 and 9, and that this was more a nostalgic story but takes it’s own turn.

I really liked the acting in it. The girl, Rey (played by actress Daisy Ridley), was amazing. There were times where I thought she looked just like Kiera Knightly. I’ve heard she hates it, but I’d just go with it…at least they’re comparing her to someone who is beautiful!  Her story was good and she held her own.  Going in to this, I’d heard that “mothers need to take their daughters to see this movie”…so I was worried it was going to have some statement about Girl Empowerment.  But if that statement was there, it wasn’t obvious in your face. She was just another person fighting the bad guys and holding her own. I thought it was really well done.

I loved all the other characters too.  I found myself very attached to BB-8, the little droid. It always amazes me how someone can create such a compelling character when it never talks – think WALLE.

Of course there are scenes where our old friends from episodes 4-6 appear!  They’ve all aged, but I think Harrison Ford has probably aged the best out of all of them.   Though their delivery isn’t as good as it once was, the nostalgia forgives that.

There was humor in this – and not the stupid Comic Relief humor of Jar Jar Binks. This was more like XMen and Pirates of the Caribbean – a tense plot where the characters just say funny things or funny situations arise. It was really well done.

There were a couple shock moments. I actually liked that you find out who the bad guy is pretty early on in the movie.  That is a big difference from the original trilogy where you don’t find out until much later.  It gives more to the plot and it makes you go back and forth on whether you feel sympathy for him. I think it was done really well.

The ending left a lot open. Obviously we know it’s going to be a trilogy, but I still wanted more at the end. It still felt a little TOO undone for me.  The end scene connects with something stated earlier in the movie and might lend to what may happen later in the series.


I’m really excited about this and that my daughter will get to grow up seeing Star Wars movies also.  She’ll definitely be old enough to see the finale in the theater which will be really cool for us, and for my brother, her Uncle, who is a die hard Star Wars fan.

Monday, November 30, 2015

Ebates Referral for Cyber Monday

If you haven't heard about Ebates yet, today is your lucky day!  I am a huge proponent of Ebates - you get a percentage of your purchase in cash back just for starting from the Ebates website!  What could be easier?

With Black Friday last week and Cyber Monday today, you can get double cash back at over 500+ stores. Right now, Kohls is offering 10% cash back, Groupon is 10%, Walmart is 5%, JCPenny is 15%, Ebay is 5%, etc. There is always cash back throughout the year at these stores too, so use it for all your online purchases.  The best news? You get ebates even if you buy online and pick up in store!

All you have to do is create your account. There is app if you want to do your shopping from your phone or other mobile device (I got extra cash back at Kohls on Mobile Monday this way). Or you can just go to Ebates and click on the store you want to shop at to activate your cash back. They even have a button you can install to your browser now so you can go directly to Best Buy and it will notify you of the cash back back and all you have to do is click it to activate the cash back - no extra website steps now!  It will also notify you and check against your order for other coupons available from the store. How easy!  I've accumulated $50 cash back just on my Christmas Shopping so far!

So what are you waiting for? Use this referral link to get signed up and start getting cash back on your purchases!  http://www.ebates.com/rf.do?referrerid=yT7KjF8PJ4dT9RUjByPMWg%3D%3D&eeid=28187

Friday, October 23, 2015

Book Review: How to be a Pirate (How to Train Your Dragon #2)

How to be a Pirate
by  Cressida Cowell
Date Read:  10/14/15
Rating: ★ ★ 

This was another fun book in the How to Train Your Dragon series.  I actually really like Fishlegs.  It’s nice that even though Hiccup is kind of an outsider in his tribe, he has a friend, a human friend.

I really enjoyed the parts where they would find something that says “DO NOT OPEN” and they opened it anyway.  Then shocker, something bad would happen.  The tribe should really start listening to Hiccup and give him more credit. He knows what he’s doing!  He may not have the brawn that the other Vikings do, but he’s smart and scrappy, and that’s just as important!

Hiccup had a horrible time learning how to sword fight at sea.  But I really liked the discovery at the end of the book!  What a cute way to say why he had been so clumsy!!!  <SPOILER> Having a dad who is left handed, he was taught sports all right handed. I think it would be really tough to have a dominant hand and then try to learn to do something NOT using your dominant hand!  Poor Hiccup!  But no one will know because they decided it was best not to tell anyone about their discovery and battle in the cave <END SPOILER>.

This book had good pacing.  It had quite a bit of humor.  I liked the lessons in this book about putting the greater good before your own and that you can “receive a hero’s welcome without coming home a hero”.

Overall, I still really like this series and look forward to continuing.

Friday, October 16, 2015

Book Review: How to Train Your Dragon

How to Train Your Dragon
by  Cressida Cowel
Date Read:  10/15/15
Rating: ★ ★ 
★ ★  ★ 

I will first start by saying this book is nothing like the movie.  The movie basically took the names and the very broad concept of training dragons and that is it.  Well, I guess it also still made Hiccup a misfit, just for different reasons.

I listened to this as an audiobook, and I really enjoyed it.  The guy who read it had a great accent that just added to the story – you really got wrapped up in the Viking lore and such.  There were times where he would do the yelling parts though and it hurt my ears!  Haha.

This book focuses more on the “training your dragon” aspect of the story, which the movie briefly touched on in subduing the dragons.  I really liked the part when Hiccup read the book “How to Train Your Dragon” with all the credits and such, and then opened the body and it just read “Yell at it”. It made me laugh pretty hard.  Silly Vikings thinking they can just yell and control things.

Hiccup had to learn a different way to train his unusually small (and toothless) dragon.  I liked that the dragon language was called “Dragonese”…how cute!  Though, I wonder how Hiccup learned it if no one else in the tribe spoke it…

While Hiccup wasn’t the strongest or have the largest presence, you could still tell he was brave and leader material when he gave his first dragon to Fishlegs and had to go back to get himself another dragon while thousands of dragons were chasing them out of the cave.

Then the Green death, giant sea dragon, appeared on their shores and Hiccup and the others had to show their warrior strengths. 

One very different thing between the book and the movie was that the dragons talk in the book!  Well, that’s because Hiccup can speak Dragonese.  Toothless actually talked with a weird little stutter. I’m not sure if it’s just because he has a stutter or because he was still an infant dragon. Either way it took some getting used to, but he was so darn cute…even when he was making silly comments.

I also enjoyed the dragon scoring at the beginning of the book. I thought it was a nice touch in the movie that they put a scene in there where one of the kids scores the giant dragon they were fighting.  It was a lot of fun.


Overall this book was very entertaining.  This would be a great book to read to kids at bedtime, even if they love the movie.  Both have great stories, and you’ll still love Hiccup and Toothless in both versions!

Thursday, October 15, 2015

Book Review: The Beatrice Letters

The Beatrice Letters
by  Lemony Snicket
Date Read:  10/14/15
Rating: ★ ★ 

I’m not sure how I feel about “The Beatrice Letters”.  I read this after I finished book 13.  Otherwise I think I would have been thoroughly confused.  I don’t think they should have released this before book 13 released.

First I will say that it was a very unique way to present the book.  I had a copy from the library, so it was quite beat up, but I could see through to what was probably originally very pretty. I was actually surprised that the letters hadn’t been punched out of the library copy.

I was hoping that this compilation of letters was going to provide some answers to some of our still unanswered questions…but all it really did was pose more questions.  Did the Beatrice really sink on their way back to civilization? If they survived, where are they now? Why doesn’t Lemony Snicket want to see baby Beatrice…she’s his niece after all?

I let others work on the anagram themselves since I had a library copy and people have been able to work on this for years.  The one that seems the most sensible is “Beatrice Sank”.  There was a poster included in the book that showed a boat wreck with a piece that said “Beatrice” on it with items that would have been the orphans. Then there is a cave on the other with a bunch of stuff in it.  So the original thought was that they made it safely to a cave…but after reading the letters, I believe it was Snicket who was in the cave, doing yet more research in the Baudelaire’s lives.

We do know that Beatrice survives the boat ride in the very least as she grows up writing these letters and following Snicket around trying to get in touch with him.  She mentions that Sunny was on the radio…which would have only happened if Sunny survived the boat ride as well.  But it’s unclear when they disappeared again and why.

I feel like Snicket (Daniel Handler) just leaves all these weird open ended questions because it’s easier than planning out his story and making sure he doesn’t contradict himself.  I would like to one day really see the full story and get all our answers…but I don’t believe even Handler actually has the answers to his own story.

Tuesday, October 13, 2015

Rick Riordan's Sword of Summer, Norse American Tour Event and Trials of Apollo sneak peak info

My husband and I have been dying to see Rick Riordan for YEARS (5 years to be exact since he was last in Arizona).  He normally doesn’t go west of Texas on his tours, which is just too far to drive to attend an event.  We’ve been super bummed because he’s one of our favorite authors (and I heard he’s hilarious).  So when my husband saw the blog post with tour dates and locations for his Magnus Chase Tour and Phoenix was on the list, we signed up as soon as we were able to buy tickets!!

KEEP READING AS THERE IS BIG NEWS REGARDING A NEW SERIES!!!

The event was held by Changing Hands Bookstore at an offsite location in a high school auditorium.  In order to get a ticket to the event, you had to buy a copy of the hardcover book at list price ($19.99 + tax) and this would get you up to 2 tickets to the event.  Since Riordan does not do autograph signings during his events, the book was also pre-signed by him.  The event was scheduled to start at 7pm, with the doors opening at 6:30pm.

My husband and I drove straight there after work and we didn’t arrive until 5pm. I had attended an event at the same location held by Changing Hands for Cassandra Clare’s “Clockwork Princess” release party and the line was super long already by then.  So needless to say, I felt like I was in the twilight zone when we were about the 10th or 12th family back in line.  There were maybe 30 people in front of us in line!  Woohoo, I knew we were going to get pretty good seats.

While waiting in line, we were able to pick up our signed copy of the book and they passed out these really cool foam shields. I believe it was part of Riordan's marketing; they had a lot of them. They opened the doors a few minutes late, but we were able to get a good seat in the 5th row in the middle. Hooray!  The event started late though, around 7:10pm.


Riordan finally walked out and basically gave a long history.  He started from when he was a baby!  He went on to explain about his dislike of reading as a child, the teachers that helped him find books he actually enjoyed, and the teacher that pushed him to submit his first story to a publishing company. While a lot of this history you can get from his website and such, it was still fun to hear it firsthand. He is a great entertainer and storyteller. 


We got to see some very strange covers from the published versions of his stories in other countries.  Some of them are utterly ridiculous…like this cover in Germany!  They've changed the cover since then, but I didn't get a picture with the new cover.


He talked about Magnus Chase and the Sword of Summer a little bit, but since the book just came out, we did not get much information so as not to have any spoilers.  THANK GOODNESS!  We did get to see some character art of the new characters from Magnus Chase though.  If you’ve read the book, what do you think about these?  We heard a really neat story that there was a girl who did a really awesome fan art cover for Blood of Olympus.  Disney thought it was good that they included it as bonus content in some version of the book.  And they now have hired her to do the character art going forward.  What a cool story – to go from fan to being paid by Disney!!  Here are some examples of the character art for the Magnus Chase characters, and the 9 Worlds (my picture of Sam was too blurry so I didn't include it).


He told us that the Magnus Chase series is going to be a three book series as of now.  He said it’s possible it could change as he continues writing, but it is currently planned to just be a three book series.  He also went back to one POV in this series.

FINALLY… HERE IS THE BIG NEWS!  Rick Riordan announced he is working on ANOTHER series as well, that is in the world of Percy Jackson.   He stated that there were quite a few loose ends at the end of Blood of Olympus so he thought he needed to go in and round out Percy’s world.  This new series is titled, “The Trials of Apollo” and will be told from Apollo’s POV.  It is going to be a FIVE, did you catch that, FIVE, book series.  He also stated that since this is being written to really close out Percy’s world, we will be seeing ALL of the characters from all of the series throughout The Trials of Apollo’s series.  Are you as excited as me?! 


Here is the summary from Goodreads (it was word for word the description that Riordan read to us last night):
"How do you punish an immortal?
By making him human.
After angering his father Zeus, the god Apollo is cast down from Olympus. Weak and disorientated, he lands in New York City as a regular teenage boy. Now, without his godly powers, the four-thousand-year-old deity must learn to survive in the modern world until he can somehow find a way to regain Zeus's favour.
But Apollo has many enemies - gods, monsters and mortals who would love to see the former Olympian permanently destroyed. Apollo needs help, and he can think of only one place to go . . . an enclave of modern demigods known as Camp Half-Blood." 
Disney is also finally putting together a physical version of the the short stories “Demigods and Magicians”, the Greek and Egyptian crossover stories. My husband and I have been waiting for this to happen for a long time now and it’s finally here!  BONUS: if you purchase the hard copy of this compilation, there will be a sneak peak at a chapter from The Trials of Apollo!!

Release dates for the projects Riordan is currently working on are as follows: 
  1. Demigods and Magicians – April 5;  
  2. The Trials of Apollo: The Hidden Oracle – May 3; 
  3. Magnus Chase & the Gods of Asgard: The Hammer of Thor – October 4.


I hope this information was helpful to anyone who was not able to attend an event on Riordan’s #norseamericantour.  If you ever get a chance to see Rick Riordan in person, I highly recommend you take it.  He’s was great to listen to and has a great story of perseverance for budding authors!

Friday, October 9, 2015

Book Review: Mechanica

Mechanica
by  Betsy Cornwell
Date Read:  10/09/15
Rating: ★ ★ 
★ ★ 

I received this book for free in exchange for an honest review, through Goodreads First Reads.

* NOTE: THERE MAY BE SPOILERS *

While some parts were a little slow, as other reviewers have mentioned, I actually enjoyed this book.  It was a refreshing and unique retelling of Cinderella.  While similar in a macro aspect to Cinder, it is actually very different – I have read both.  Cinder is sci-fi, while Mechanica is just that – she’s an inventor who lives a life similar to Cinderella’s.

There were points where the plot was very slow.  There were a lot of descriptions about her research and how she was inventing things and cleaning things, etc.  But I still didn’t find myself bored.  It was slow, but not necessarily boring.

I did feel that the background was way too long.  You ended up needing some of that information to understand Nicolette, but I think there may have been another way to interject that history rather than just giving us 62 pages of history.  Or maybe some of it could have been cut down.  Unless of course if there is going to be a sequel which would play more on the faerie history and such.

I enjoyed following Nicolette’s journey of acceptance.  She learned to accept who she was and worked to take back her own life.  She didn’t just lie down and let herself be run by her step family.  She worked hard to achieve her dreams.  There was no fairy god-mother in this story.  (Ok sure, Jules helps her find a ball gown, but that doesn’t count).  Nicolette built her invention herself, sewed her own gown,  made her magnificent shoes, did her hair herself.  She was her own fairy god-mother, and I thought that was a nice touch.  It’s empowering to younger girls.

While I also enjoy my romances, especially with dreamy princes, it was also refreshing to have a story where the main plot point was not on romance.  From the summary of the book I knew she wasn’t going to end up with the prince, I still found myself really liking him.  Rather than focusing on love in the sense that we usually think about, Cornwell focused on self-love and friendship love.  Not all love is romantic.  I think this was a unique take on still including a “love story” though not in the typical sense.  It was refreshing to watching the friendships with Caro and Finn develop and how they became a family.


It doesn’t appear that this is set to be a series yet.  But I feel there were unanswered questions that needed to be cleared up – big ones.  What is so sinister about the ashes? What will happen with the impending war? I feel like it was set up for a sequel, so I hope it comes to fruition.  And I secretly (or not so secretly since I’m writing it on goodreads) hope that she still ends up with the prince in the end.

Brooklyn's First Birthday Party

Brooklyn’s first birthday party was a success!  I had a vision in my head of how I wanted it to turn out, and this time I believe I succeeded!  The decorations were beautiful, the food was delicious, and the guest turnout was amazing!

I’ll start with the decorations. I decided I wanted to finally use my cricut machine because I wanted specific decorations and I was not interested in spending a butt load of money on Etsy to get them.  After patrolling Pinterest for several days I decided I wanted to make a banner that said “Happy Birthday”, a banner that said “ONE” for her high chair, and a banner to display a picture from each of her first 12 months.

The Happy Birthday and "ONE" banner were a bit of work but they turned out great and exactly what I wanted. I hung the “Happy birthday” banner over the window in our dining nook – which was next to the high chair.  As you walked further in to the house, this was what you first saw.  I hung her “ONE” banner on her high chair, perfect for pictures of smashing her cake.


In addition to the “ONE” banner, I also attached 4 balloons to the back of her high chair.  It completed the look and gave a little extra color to the kitchen.

I also created a monthly banner to display a picture of her every month, starting at 0 for newborn.  This was a neat way to show how much she grew each month.  I thought it turned out great.  I hung it in the living room where everyone walked in and it ended up being near where we opened all her gifts.


I saw a cute idea on Pinterest for a caption contest. We decided to make a challenge because we didn’t want to have games.  I used publisher to make the file and then saved it as a PDF and printed it out.  I found a lot of silly pictures of Brooklyn throughout her 12 months and taped them on some matching paper so that guests could write captions on them.  We didn’t end up getting very many, and I believe it’s because we didn’t specifically tell people to do it.  It was just on the wall as guests looked around at all the decorations.

For Brandon’s 30th birthday I had seen an idea to make the number 30 out of pictures.  It was such a hit that I decided to do it for Brooklyn’s first. I created a giant number 1 out of 4x6 pictures.  I was thinking it wouldn’t be enough pictures, but once I got it up on the wall, it was enormous and had plenty of pictures.


I also created a first birthday chalkboard poster.  I found a really cute free file here and then used my free photoshop trial to edit it.  I had to download the font pack though. I just performed a google search for KG Font and found the free package for download.  If you have an old version of photoshop, you may not be able to use these fonts.  Then I saved it as a JPEG and printed it in 8x12 size at Costco.  They were by far the cheapest.  I decided to hang it in the kitchen so as people waited in line for food and drink, they could read all about Brooklyn’s favorite things.


I wanted something out front designating our house for Brooklyn’s birthday.  I created a "Fun to be One" sign that we staked in to the grass in the front yard.  I attached some balloons to it.  It was windy though, so the balloons were just blowing around like crazy.  It still worked though and helped people find our house easier.


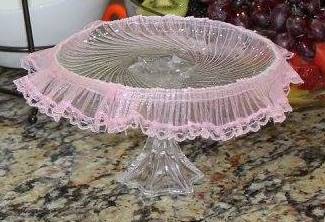
I also wanted to have a cute way to display Brooklyn’s smash cake.  I saw a super cute idea on pinterest to take a plain cake stand and glue some frilly ribbon.  I was able to find some supplies at Goodwill and created a cute cake stand for her smash cake.


The final decoration I had was a Sparkle sign.  Again, I used publisher to create this file.  I wanted to add a little bit of sparkle.  We have a weird little nook in our walkway from the front rooms to the kitchen and family room area. I decided this 5 x 7 size would be perfect in a frame sitting here. The nook has a light also, so I turned that on to highlight the sign as people walked through.


The food was a hit.  Brooklyn’s birthday party was a brunch.  Again, thanks to pinterest I found some great ideas for food.  The first was mini-chicken-and-waffles (what better brunch food? It literally combines breakfast and lunch in ONE dish!).   I used mini Eggo waffles from Walmart.  We toasted them in the toaster and then we put a drop or two of maple syrup in the middle of the waffle and topped it with a Chick-Fil-A chicken nugget.  I placed a toothpick (with a flag that I made) through them to hold them in place.


We also created donut and fruit kabobs. We were shocked at how fast these went.  I didn’t expect them to be as big of a hit as they were.  We bought glazed donuts at Walmart, Strawberries, and bananas.  We cut the strawberries and sliced the bananas.  Then we placed them in the following order on a wooden skewer: donut, strawberry, banana, donut, strawberry, banana.  These things didn’t last very long!


We made some mini quiches to bring some more savory to our brunch.  This is the recipe we used and it was actually relatively easy. We just had to make several batches which took a while.  There weren’t many quiches left over at the end of the party.

We made some mini apple pies that added some more sweet in addition to our fruit.  They were super easy and would be a great dessert to bring over for holiday parties.  There were none leftover at the end of the party - and I didn't even get to try one first!

Finally we made some pumpkin dip to add some seasonal flare!  We served it with vanilla wafers and everyone said it was delicious.  The recipe makes a TON though, so we still have a ton left over.

I was able to reuse some decorations I had saved from my baby shower and some things that were brought to us after Brooklyn was born.

I first used a mason jar to house the paper straws I bought. I cut a piece of pink ribbon and a piece of gold ribbon and tied them around the jar in a bow. I then used my fall serving tray (which I hadn’t had a use for yet!) to place the straws, cups, napkins and plastic ware.  I placed the plates just next to the tray.  I think it was a great set up.  I used mason jars that were from my baby shower to hold the plastic ware and just covered the ribbon that was already on them with a pink ribbon I had.  I used tape to hold the ribbon so I didn’t have to get out my glue gun…and I can also remove the ribbon if I need to use them again.


I put some beverages in glass pitchers that we received for our wedding. I used orange juice, milk, and spiced apple juice.  We put them in a tin bucket that was filled with ice to keep them cold.  We also brewed coffee and had water bottles in an ice chest in the backyard.  I forgot to take pictures of these.

I covered the tables with plastic table cloths I purchased at Party City.  I was able to cut them all to size to fit my tables and ended up having extra.  It worked out because I was able to place some of the extra under her high chair for her cake smash.  Although, she still managed to get cake in places where there wasn’t a table cloth liner!  I was even able to put table cloth on the gift table (chest) to keep it all tied together.  On the tables, I placed a mason jar with glass marbles and pink flowers that were from my baby shower. I was even able to use the ribbon that was already on most of these jars.


Finally I hung a couple of balloons on the banister at the bottom of the stairs.  We bought a helium tank from Walmart for $35.  You could just go to Party City to have them do it for you, but then you have to drive them all the way home.  It was more convenient for us since her party was early to just have the tank ourselves.  And I was able to pick and choose how many I really wanted and which colors as I wanted, rather than having to try to figure it out ahead of time.  It also comes with a bag of balloons so now I have some for future birthday parties!

The party was so much fun and Brooklyn had a blast.  She wasn't sure about the cake at first, but after she got a few tastes in, she devoured it!  And it ended up in her hair, on her headband and in her ears!  We want to thank every one who came out for her party and celebrated her big milestone!  She was spoiled by everyone and it was so nice to see so many of our friends and family!


Tuesday, October 6, 2015

Book Review: The End (A Series of Unfortunate Events #13)

The Penultimate Peril (#12)
by  Lemony Snicket
Date Read:  10/06/15
Rating: ★ ★ 

**BEWARE: THIS REVIEW CONTAINS SPOILERS**

I was super excited to finish this series.  I was hoping for an exciting conclusion and some bombshells to wrap up our questions.  Unfortunately, that didn’t happen. While I didn’t think this book was quite as much as a letdown as some, it still didn’t meet my hopes and expectations.

This story took a strange turn as the Baudelaires ended up shipwrecked on a strange island.  There was a group of colonists who were basically in a cult.  The head of the cult was strange and conniving and completely just thrown in there.

With all the characters that had graced us again in the previous book, I expected this big schism or something between VFD and all the villains.  But no.  VFD gets completely forgotten in this book. We never learn what the big schism was that tore apart VFD. We never learn what the sugar bowl is or why it is important. What I felt the most frustrated at was that other characters DID know, but kept telling the children that there are things in the world children shouldn’t know. Seriously? He did that because he did not even know what the sugar bowl was. He just needed something for the plot to focus on for a while.

I feel as though Snicket (or the actual author) just wrote and never had an outline for his story. He didn’t know where it was going to go and that is why there were still so many unanswered questions.  Did the Quagmires die? We assume so with the whole “Great Unknown” line, but we don’t know for sure.  We assume The Baudelaire parents used the poison darts on Olaf’s parents making him an orphan, but we do not know why.  We finally discovered who Beatrice is, but we do not know why she left Lemony Snicket to be with Mr. Baudelaire instead.

The love story between Olaf and Kit was just thrown in there too.  While I appreciated that it showed Olaf’s compassionate side and that he wasn’t always evil, it came out of nowhere!  There should have been something that pointed to that when you go back to think about it. But there’s nothing. It just made the fact that they both died a little sadder.  When Olaf said that he lost his true love, I assumed it was Esme, but after that scene, you change to assume it was Kit.

While I appreciate the theme of the book, that we can never know all the answers to life’s questions, this is still a story and there should have been more wrap up.  All stories end and we understand that the characters move on without us, but there is still a satisfactory ending to that specific story.

Although I did feel that we did get some answers if you paid attention to the details and the obscure side notes. It wasn’t quite as bad as I was expecting. I didn’t expect Chapter 14.  I didn’t like that he purposely held the information regarding the name of the boat that Violet discovers.  At least we only had to wait until the end of the chapter, but that just seemed to kind of be the theme throughout the series – he would pose questions or uncover information and not reveal it to the reader. Probably because it didn’t fit in with the story.  Another reviewer said something that I thought was interesting. When the children with staying with Esme Squallor, she mentioned that Beatrice had stolen from her, and the children didn’t react to this statement. If their mother was Beatrice, they should have reacted to that.  Another ploy from the author to try to prevent the reader from connecting Beatrice as their mother.

I also didn’t like the way the author handled the world. Yes, it’s a terrible place where terrible things can happen to good people, good people do bad things, and people die. But the lives of the Baudelaires were far from normal. I understand that the author was trying to tell us that even though bad things happen, you can’t run from it.  You have to persevere and live through it, otherwise you’ll miss the happiness in life too.  I just wish he could have done this in a more realistic way.

There was one point that he makes in this book though that really stood out to me.  He stated that “It is almost as if happiness is an acquired taste, like coconut cordial or ceviche, to which you can eventually become accustomed, but despair is something surprising each time you encounter it.”  This has really stuck with me ever since hearing it.


My final thought is that I listened to this as an audiobook, so as far as I’m aware, the children were on the boat going back to society. In my mind they made it.  However, another reviewer said the book actually had a picture at the end of the sea, with broken pieces of wood with one having the name “Beatrice” on it, implying the boat was shipwrecked again.  So either the Baudelaires drown or they became cast aways on another island. I think I’m glad I listened to the audiobook so that I can envision my own future for the Baudelaires where they raise Beatrice and grow old together.  I may pick up the Beatrice Letters at a later date to see if we get any other questions answered…but if all it does is pose more questions, I think I’ll skip it.

Monday, October 5, 2015

Book Review: The Penultimate Peril (A series of Unfortunate Events #12)

The Penultimate Peril (#12)
by  Lemony Snicket
Date Read:  09/30/15
Rating: ★ ★ 
 

I enjoyed the new setting of this book. We were introduced to several new characters in this book and also got to see several old characters. I thought it was an interesting way to sort of recap a lot of the series by bringing these old characters back in.  It’s starting to get hard to keep all the characters straight though.

I appreciated that Count Olaf is no longer in disguise and not trying to hide that he’s evil. I just feel like we’re not really getting any answers to any of the questions that have been posed throughout the previous 11 books.  Nothing has been tied together.

I liked the chapters where the Baudelaires were split up and each had a chapter. I thought it was a cute idea to have each chapter end the same way, with them thinking relatively the same thing, at the same time.  I’m just starting to get tired of all of this build that got me so excited, but not getting any answers yet.

I do appreciate that Snicket has focused on the fact that sometimes the children have had to do bad things in order to get out of their predicament, but then have them questioning whether they are still good people. SPOILER IF YOU HAVEN’T read and plan to read the Divergent series: I hated the ending to Allegiant (the Divergent series) because the main character defeated the bad guys by doing the exact thing they were planning to do to her, to them.  How does that make her any better than them???  So I do appreciate the fact that it makes you question whether doing to the wrong thing for the right reasons still makes you a bad person or not.

There was a violent, gruesome death in this book that I wasn't expecting. We haven't had a violent death in quite some time. I found myself hoping it was Carmelita (I can't stand that girl), but of course it wasn't.  These poor kids have had a pretty rough life, and I hope they get some semblance of a happy ending.

Interested to see where this goes now that they are back with Count Olaf.  I’m hoping for a big ending and info dump to answer all our questions, but I’ve seen some reviews that makes me expect to really not having anything answered. I guess I should have read the reviews of the last book before I decided to spend my time reading/listening to 13 books…

Tuesday, September 29, 2015

Birthday Project #5: Smash Cake Stand


Another pinterest idea was a cake stand for Brooklyn’s smash cake!  This was a super easy project that cost very little money. I went to Goodwill and looked through all their items. I found a pretty candle holder and crystal plate that matched.  Each was just $0.99.  I found the ribbon at Michael's on sale.

Total Cost:
Approximately $4, + gorilla glue on hand

Supplies:
Candle Holder
Small plate
Gorilla glue
Ribbon

Instructions:
  1. First you need to pick out your candle holder and plate.  Don’t choose a candle holder that is super tall.  Ideally one that is 2 or 3 inches tall is perfect for this project.  Pick a plate that coordinates.  Otherwise you could always spray paint them.  I found a crystal candle holder and a crystal plate.
  2. Place a line of gorilla glue along the top edges of the candle holder and carefully place the plate on top, as centered as you can get it.
  3. Press down and let it sit overnight for the glue to cure.
  4. Once the glue is cured, you can add your ribbon.  Roughly measure out how much ribbon you’ll need to rim the outside of your plate and cut it.  It is much easier to manage that way.
  5. Place a line in small increments around the rim of the plate and press the edge of the ribbon in to it.  TIP: It took 3 of us to complete this – One of us placed the glue, one of us place the ribbon, and the third held the end of ribbon not glued.  My ribbon kept falling off the glue because it was too heavy. So you will need someone just to hold the ribbon at the same height as the plate.
  6. Repeat step 5 all the way around the plate and trim any excess ribbon.
  7. Let the glue cure overnight.  You now have a pretty cake stand for your smash cake!


Birthday Project #4: Sparkle Sign


Instead of buying a pricey little sign from Etsy, I decided that I could make one myself. Since I was doing a pink and gold theme, I thought the sparkle saying would go well.  Here’s how I did it:

Total Cost:
Approximately $3, + cardstock, glue, and picture frame on hand

Supplies:
White cardstock
Printer
Scissors
Glue / Mod podge
Glitter
Picture frame

Instructions:
  1. First you need to type up your sign in Publisher or Word. I used publisher. I set the size at 5x7.
  2. Insert a pink 2 horizontal gradient background to the file using two shades of pink.
  3. Choose two fonts – I chose a script font and a print font (Edwardian Script IT and DaunPenh).
  4. I set the script font size at 90 and the DaunPenh font size at 75.
  5. Create a text box for each line and type in the words, setting font, size, and color on each – I chose gold font to match my pink and gold theme.  My text was “she leaves a little Sparkle wherever she goes”.
  6. Adjust the location of each. You can overlap the text boxes so the words are closer together.
  7. Add small circle shapes around the text in the same color as your text.
  8. Save the file as a PDF and then print it on cardstock, ensuring it prints in 5x7 size.
  9. Cut out the picture.
  10. On each circle, put a dab of glue covering the entire circle.
  11. Sprinkle glitter over each circle.  I bought the glitter at Hobby Lobby and used my 40% off coupon.  Shake the extra glitter off.
  12. Once the glitter and glue has dried, place the picture in a frame so it can be displayed! I used a picture frame I already had on hand.


Monday, September 28, 2015

Birthday Project #3: DIY Fun to be One Sign


I wanted something that I could put outside that would help people narrow down our house when they arrived for Brooklyn’s party.  About half of the people had not been to our house yet and it’s in a corner by a fire hydrant, so it’s hard to tell by where the cars are parked.

I saw a cute idea on pinterest (shocker!) and decided I could make it at home with supplies I already had!  It was super easy and looked great.  I wish it hadn’t been windy so the balloons could have just floated above it, but it still turned out great anyway.

Total Cost:
Approximately $0, (cardboard, paint, wood stake all on hand)

Supplies:
Cardboard
White paint
Pink paint
paintbrush
stencils
pencil
wood stake
staple gun

Instructions:
  1. First you need to cut out your piece of cardboard.  I used one side of the Evenflo carseat we had just bought Brooklyn.  It was the perfect size.
  2. Using the cardboard colored side, paint the piece of cardboard white.  It took 2 -3 coats of white paint to cover so that no cardboard color showed through.
  3. Let the paint dry.  The cardboard warped a little on me as it dried, but don’t worry, it won’t matter once you staple it to the wooden stake.
  4. Next, I created stencils by just printing them at home using cardstock.  I picked a font I liked and made the letters for “fun” and “one” size 450.  I printed them out on cardstock.
  5. Then I made the letters for “to be” in size 360. You don’t want it to be too small to see, but I wanted it to be enough that you eye noticed the size difference. You want “Fun” and “One” to stand out.  I also printed them on cardstock.
  6. Cut out the letters so that you have a stencil for each letter.
  7. Eyeball (or measure if you’re OCD) where to place your letters on the sign.  Then use your stencil and trace the letter using a pencil.
  8. Remove your stencil and look at the placement of your words.  If they look good, move on to step 9.  If you need to adjust spacing or location, erase the pencil and repeat step 7.
  9. Using a small paintbrush and pink paint, fill in the letters.
  10. Let the paint dry.
  11. Once the paint has dried, use a staple gun to attach the sign to a wooden stake.  Stake the sign in the yard.

NOTE:  For added decoration I blew up some pink and gold balloons (though in the picture they look yellow) and attached them to the sign as well using a staple gun.


Birthday Project #2: DIY First Birthday Monthly Banner


This was the second project I wanted to tackle for Brooklyn’s birthday. This is similar to my previous blog for the Happy Birthday and ONE banner, but the sizes were different.  I ran in to a few snags with my Cricut machine tearing the paper as well. I ended up having to buy a new mat and a new blade.  It ended up cutting better, but I still had trouble with it cutting the numbers out.

Total Cost:
Approximately $3, + mod podge, ribbon, and paper clips on hand; in addition to the $20 for the font cartridge. If you already have a cartridge or you don’t mind the basic font, then it is really just $3.

Supplies:
Light pink textured Cardstock
White textured Cardstock
Gold Glitter Cardstock
Cricut Machine
Cartridge with your preferred font/shapes
Mod Podge or Glue
Light pink ribbon
Paperclips
Packing tape (or scotch tape)

Instructions:
NOTE: I didn’t take any pictures while doing this project because I finished it last minute a day before her party due to my struggle with the paper tearing.  Reference my Happy Birthday blog for pictures on putting it all together.
  1. First you need to decide what shape you want your banner to be in. I chose a shape that was in the basic cartridge to save money. Also I actually really liked the shape – so it worked out.  TIP: I think perhaps my blade dulled when cutting the glitter cardstock, so I suggest saving the glitter cardstock cutting for the end, just in case!
  2. Once you have your shaped picked out, decide what size you want. I did 3” x 3”.
  3. Fit as many of that size shape on one page.
  4. Place the color paper that you want the large size cut in to on the mat. I used the glitter cardstock. Then load the mat in the machine.
  5. Click cut, and adjust any settings to cut on the glitter cardstock. I used a depth of 5, pressure of 4 and cut speed of 5. This is a simple shape, so the speed worked just fine.
  6. Once cutting is done, remove the mat and punch out your shape.  You now have your base! Repeat cutting steps to obtain the amount of banners you need to spell out your saying.
  7. Decide what size you want your next layer to be. I did 2” x 2” so there is about a ½” on all sides, and I think it turned out great.
  8. Fit as many of that size shape on one page. 
  9. Place the next color paper on the mat.  I used the light pink cardstock.  Load the mat in the machine.
  10. Click cut and adjust any setting to cut on the pink textured cardstock. I used a depth of 4, pressure of 4, and speed of 5.
  11. Once cutting is done, remove the mat and punch out your shapes.
  12. Using the cartridge which has the font you would like to use, choose all the numbers you need. I choose from 0 (newborn) through 12.
  13. Adjust the size of your numbers so they fit within the shape, I ended up having each number be 1.5” tall.
  14. Fit as many of your numbers on one page.  I was able to fit all of them on one sheet – and even had room to run some of them again when the first ones tore.
  15. Place your next color of paper on the mat. I used white textured cardstock. Load the mat in the machine.
  16. Click cut and adjust any settings.  In theory you should be able to use the same settings as step 10 for the textured cardstock, but slow the speed down a bit because these are more intricate.  My cricut kept tearing at the angles in some of my numbers – I specifically had trouble with the number 1 (go figure). I just cleaned them up a bit with scissors and most of them ended up looking okay.
  17. Once cutting is done, remove the mat and punch out your letters.  TIP: I think perhaps my blade dulled when cutting the glitter cardstock, so I suggest saving the glitter cardstock cutting for the end, just in case!
  18. Now that you have everything cut, it’s time to put it all together!  Grab your mod podge or glue!
  19. I used a paintbrush to brush a thick layer of mod podge on the back of my light pink cardstock shape. 
  20. I eyeballed the center of the glitter cardstock and pressed down.  It is hard to get the glue to stick to the glitter, so I had to press down firmly with my palm for several seconds, and then I placed something heavy on top of it to help hold it down while the glue dried. CAUTION: Some of the glue or mod podge may squeeze out the side, so make sure you’ve dabbed it all off before placing something on top of it so it doesn’t stick to your pretty banner!
  21. Repeat step 20 for all banners.
  22. Next, brush some mod podge or glue on the backs of your numbers and eyeball the center – remember to offset for the ones that will have two digits (10, 11, 12). Press down firmly. I found it was much easier to glue textured cardstock to textured cardstock, so just a few second hold with my palm was all it needed.
  23. The next step is to hole punch the top of your banner so you can hang it.  I punched two holes in the top of each banner.
  24. Pick a ribbon to string through the banner, leaving room to hang it on the sides.  I left about 10 -12 inches (I just eyeballed how much I thought I’d need) on each side to tie a bow to hang the banner.
  25. I then taped a paperclip to the back side of the cardstock so that I could attach a picture below it using packing tape (because it’s sturdier than scotch tape).
  26. Attach all your pictures in order and then hand it on the wall.  I used a nail and then tightened the bow around the nail.

  27. Voila! Your project is complete!
Related Posts Plugin for WordPress, Blogger...