Thursday, May 21, 2015

7 Months Old

Since I’ve been taking monthly pictures of my daughter and posting them in my office at work, I’ve been getting rave reviews of what a cute idea it is. Well, I can thank all the ideas from Pinterest. For the next four months (OMG, I can’t believe it’s so close already) until Brooklyn turns 1 year old, I will post a blog about all our advancements in development, etc.

The most recent month is 7 months (but she’ll be 8 months this weekend)!  By 7 months she recognized her name and turns to you when she hears it.  She has been able to sit completely unassisted (though we’re still working on going from laying on the floor to a sitting position).  She played on a swing at the park for the first time and absolutely loved it!  She also started waving – though intermittently.  She also started using her walker and motors around the kitchen and discovered that she can reach the knobs on the cabinets and think it’s a blast banging them. She still has those chubby cheeks and thighs.


For comparison, I have posted all the previous months below so you can see how much she’s changed.  I’m so amazed at how much she’s grown and developed in just 7 months!  While I’m sad the stage of her cuddling and not moving has come to an end, I’m anxious to see all that she still has to learn and can’t wait until she can talk to us and walk around!  She’s such a joy – I can’t imagine life without her.  She’s a blessing and I’m enjoying every single minute of it!


Wednesday, May 20, 2015

Project: DIY Hairbow and Headband Tutorial

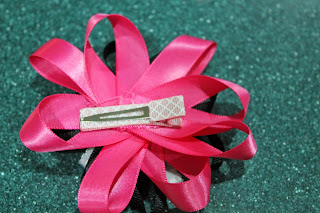
One of the things I really wanted at my baby shower last year was a headband making station since I was having a girl and figured if she was like me, she’d be bald until she was 2!  Alas, she actually has a decent amount of hair, but the headbands are still super cute!  Thanks to my mom’s great idea, we ended up making a bunch of different bows and attaching clips to the back, so that I can interchange the bows/flowers with different colored and sized headbands.


I've made a lot over the last 7 months, and I've been requested several times to post a blog about how I make them.  I’m here to answer that request now!  They’re actually relatively easy and I have two different ways of doing them.


Supplies:
Ribbon (2 - 3 different colors/patterns)
Needle and Thread (if you choose the sewing method)
Scissors
Hot Glue Gun
Trinket or button
Clip


Instructions:
  1. Decide how many layers you want on your bow.  I usually do 3 layers because I think that looks best.  Then decide which color or pattern you want on each level.
  2. Cut the ribbon that you will use as your bottom layer to 5” strips (I suggest a 1/2 -1 inch shorter on all steps if you are making for a newborn because this size will probably dwarf them!).  I usually cut between 8 – 10 strips, depending on how thick your ribbon is. (If you’re only doing 2 layers, skip this step).
  3. Cut the ribbon that you will use as your middle layer to 4” strips.  Cut about 2 fewer strips than what you did for your bottom layer.
  4. Cut the ribbon that you will use as your top layer to 3” strips (are you noticing a pattern?). Cut about 2 fewer strips than your middle layer.
  5. Now you can decide how you want to fold them. You can either just fold them all in half, or you can curl them to the side.  The most recent one I made I did both (every other one), and I think it actually turned out great – it gave it a little bit more fullness.
  6. SEWING METHOD:
    1. Thread your needle with about 1 foot of thread to ensure you have space to sew and tie off at the end.
    2. Fold the ribbon in half (either straight or curled) and poke your needle through both layers about half way up the needle.
    3. Continue doing this for all strips of the bottom layer.
    4. Once all strips are on the needle, fan them out evenly in a circle and pull the needle through.  Poke your needle through several times back and forth to make sure it’s nice a secure.
    5. Tie off the thread and cut it.  You’re bottom layer is done.
    6. Repeat above steps for each layer.
    7. Once each layer is completed, thread all 3 layers together and tie it off securely – be careful as it may be harder to get the needle through by this point - sometimes I end up just gluing the layers together with hot glue.

  7. GLUE METHOD:
    1. Fold the ribbon in half (either straight or curled) and put a small dot of hot glue between the layers.  Press and hold for the glue to hold (BE CAREFUL, IT IS HOT AND THE HEAT GOES THROUGH THE THIN RIBBON EASILY!)
    2. Continue doing this for all strips of the bottom layer.
    3. Once all strips are glued, glue each piece around in a circle, evenly spaced.  You’re bottom layer is done.
    4. Repeat above steps for each layer.
    5. Once each layer is completed, place a dot of glue between each layer and glue them together.
  8. Place your trinket or button in the center of the bow and hot glue it in place.
  9. Decide how you want your bow to sit on the headband and on the head.  You will need to glue your clip to the back of the bow accordingly.  Place a strip of glue along the clip and glue it to the back of your bow.
  10. CONGRATS! Your bow is complete.  Now you just attach the clip to any headband you desire!


* Optional Modification:
For the middle layer, you can also choose to create V-edged ribbon instead of folded ribbon (see my Rapunzel headband for an example). Instead of following the above steps, do the following:


  1. Cut approximately 3 – 4 strips at 4” length (shorter for newborn).
  2. Instead of folding the ribbon, cut each end of the ribbon in a V-shape.
  3. Place them on top of each other and fan them out in a circle.
  4. Glue or sew the strips together in the middle.

Friday, May 15, 2015

Book Review: Marathon

Marathon
by  Boaz YakinJoe Infurnari (Illustrations)
Date Read:  5/08/15
Rating: ★ ★ 

Marathon was actually a pretty good graphic novel.  Having gone to Greece 1.5 years ago, I really appreciate Greek mythology and settings.  This is the story of a man who is a messenger in ancient Greece.

The beginning of the story was hard for me to follow.  It starts out as a young boy and trying to follow which one he was was hard, and there were so many different Kings. I couldn’t keep track of who was who.  Part of it was the illustrations…the people didn’t look different enough – and since there wasn’t any color used, you couldn’t even use clothing to really differentiate.

Once the story really got going though it got clearer and the story was actually pretty interesting.  It’s a bit violent though – so I guess I’m glad for less color. Haha.  The ending was a little ambiguous also. [SPOILER: I wasn’t able to tell whether he just passed out from exhaustion or whether he died.  It was very unclear.  I choose to believe that he survived – the only one, and lived a happy life with his wife. END SPOILER].

It was a quick read and I liked the mythology that was sprinkled in.  For instance, the reference to Pan.  It was well written. I just wish the beginning and ending were a little clearer.  Overall a good read though.

Thursday, May 14, 2015

Book Review: Fairy Haven and the Quest for the Wand

Fairy Haven and the Quest for the Wand
by  Gail Carson Levine (Goodreads Author)David Christiana (Illustrator)
Date Read:  5/14/15
Rating: ★ ★ 

I finally finished this book!  This story actually felt pretty long. I feel like it was drawn out to make it the number of pages the publisher wanted.  The beginning of the book wasn’t bad.  It was interesting enough and moved right along.  It was about halfway through when everyone was going through wand madness and making wishes and then seeing the repercussions of those wishes that seemed to drag on.

[SPOILER: Specifically the parts that felt long were between the mermaids Soop and Pah, and also with Rani-bat.  While Rani-bat was semi-interesting, it dragged out…and then the dialog between them got annoying. “Esteemed bat…Esteemed fairy…esteemed bat…esteemed fairy” UGH. END SPOILER]

The illustrations were beautiful though, just like the last book.  I actually like Tinker Bell as well.  I’m glad I own both the books and found both of them at the used book sale.  I’ll read them to my daughter when she’s a little older.  I just wish the story was written a little bit better.  I get that it’s written for kids,  but I feel like you can have a story at a simple level with a good pace of beginning, middle, and end.  Maybe if they had made the story 50 pages shorter I would be singing it’s praises. 
Related Posts Plugin for WordPress, Blogger...