One of the things I really wanted at my baby shower last year was a headband making station since I was having a girl and figured if she was like me, she’d be bald until she was 2! Alas, she actually has a decent amount of hair, but the headbands are still super cute! Thanks to my mom’s great idea, we ended up making a bunch of different bows and attaching clips to the back, so that I can interchange the bows/flowers with different colored and sized headbands.
I've made a lot over the last 7 months, and I've been requested several times to post a blog about how I make them. I’m here to answer that request now! They’re actually relatively easy and I have two different ways of doing them.
Supplies:
Ribbon (2 - 3 different colors/patterns)
Needle and Thread (if you choose the sewing method)
Scissors
Hot Glue Gun
Trinket or button
Clip
Instructions:
- Decide how many layers you want on your bow. I usually do 3 layers because I think that looks best. Then decide which color or pattern you want on each level.
- Cut the ribbon that you will use as your bottom layer to 5” strips (I suggest a 1/2 -1 inch shorter on all steps if you are making for a newborn because this size will probably dwarf them!). I usually cut between 8 – 10 strips, depending on how thick your ribbon is. (If you’re only doing 2 layers, skip this step).
- Cut the ribbon that you will use as your middle layer to 4” strips. Cut about 2 fewer strips than what you did for your bottom layer.
- Cut the ribbon that you will use as your top layer to 3” strips (are you noticing a pattern?). Cut about 2 fewer strips than your middle layer.

- Now you can decide how you want to fold them. You can either just fold them all in half, or you can curl them to the side. The most recent one I made I did both (every other one), and I think it actually turned out great – it gave it a little bit more fullness.


- SEWING METHOD:
- Thread your needle with about 1 foot of thread to ensure you have space to sew and tie off at the end.
- Fold the ribbon in half (either straight or curled) and poke your needle through both layers about half way up the needle.
- Continue doing this for all strips of the bottom layer.
- Once all strips are on the needle, fan them out evenly in a circle and pull the needle through. Poke your needle through several times back and forth to make sure it’s nice a secure.

- Tie off the thread and cut it. You’re bottom layer is done.
- Repeat above steps for each layer.

- Once each layer is completed, thread all 3 layers together and tie it off securely – be careful as it may be harder to get the needle through by this point - sometimes I end up just gluing the layers together with hot glue.

- GLUE METHOD:
- Fold the ribbon in half (either straight or curled) and put a small dot of hot glue between the layers. Press and hold for the glue to hold (BE CAREFUL, IT IS HOT AND THE HEAT GOES THROUGH THE THIN RIBBON EASILY!)
- Continue doing this for all strips of the bottom layer.
- Once all strips are glued, glue each piece around in a circle, evenly spaced. You’re bottom layer is done.
- Repeat above steps for each layer.
- Once each layer is completed, place a dot of glue between each layer and glue them together.

- Place your trinket or button in the center of the bow and hot glue it in place.


- Decide how you want your bow to sit on the headband and on the head. You will need to glue your clip to the back of the bow accordingly. Place a strip of glue along the clip and glue it to the back of your bow.
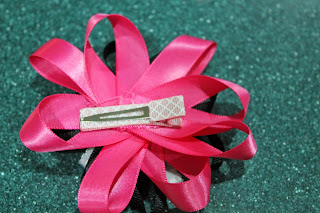
- CONGRATS! Your bow is complete. Now you just attach the clip to any headband you desire!


* Optional Modification:
For the middle layer, you can also choose to create V-edged ribbon instead of folded ribbon (see my Rapunzel headband for an example). Instead of following the above steps, do the following:

- Cut approximately 3 – 4 strips at 4” length (shorter for newborn).
- Instead of folding the ribbon, cut each end of the ribbon in a V-shape.
- Place them on top of each other and fan them out in a circle.
- Glue or sew the strips together in the middle.


0 comments:
Post a Comment